Sunday, December 4, 2011

REVIEW: Sally Hansen Nail Effects

Here's another review of nail stickers!
The first review I did was one that could be purchased online at www.bornprettystore.com

I wasn't overly impressed with the quality, ease of application or durability of that particular brand of nail sticker.  However the price was right and the selection of patterns was Amazing.
To see the full review and video application of this product click [HERE]


With that quick comparison aside let's talk about the Sally Hansen Nail Effects stickers.
Here's an overview of the main point i'll review about this product:
How would I rate the
- accessiblity?
- affordablity?
- selection?
- application?
- durability?
- removability?
- overall impression

Wednesday, November 30, 2011

Rainbow Shatter - Bundle Monster Stamping Tutorial

Holy begeebus.

it's been a long time since I've done a stamping tutorial.  Not sure why that is.  But here's a really cute and colourful one.  It's very 80's and kind of even reminds me of Lisa Frank.
It's pretty easy to do, so if you're curious to see how I did this design watch the short video below.
Happy lacquering!
~Miss80Million


MATERIALS USED:
Seche Clear - Base coat
Sally Hansen Xtreme Wear - Marine Scene
Sally Hansen Xtreme Wear - Ivy League
Bundle Monster Image Plate - #208 (from the 2nd bundle) from www.bundlemonster.com
Konad special polish - Black from www.wowsocool.com
Konad Stamper & Scraper - from www.wowsocool.com
Sally Hansen - Insta Dry Anti Chip Top Coat

OTHER POLISHES USED ON OTHER FINGERS:
Kiko - #277  (available in Kiko stores in europe.  possibly online also?)
China Glaze - Grape Juice

***IF YOU'RE NEW TO STAMPING (KONAD AND/OR BUNDLE MONSTER***

Check out these videos for some helpful tips and tricks and info:

KONAD ANSWERS - to all your fequently asked questions:
http://www.youtube.com/watch?v=civQl9mAuWo&list=PLAC46D18903E635DD&index=2
KONAD TESTS - testing out non special polishes for stamping
http://www.youtube.com/watch?v=E7hLdrHaHms
HOW TO CLEAN YOUR STAMPER, SCRAPER, AND IMAGE PLATES:
http://www.youtube.com/watch?v=OEPsWTFqIH0&list=PLC58E5D9FAB07659A&index=1
ORIGINAL BUNDLE MONSTER REVIEW VIDEO:
http://www.youtube.com/watch?v=c5Rv2-sWptQ&list=PL28AA637598BFD059&index=5
ORIGINAL BUNDLE MONSTER VS KONAD: (COMPARISON REVIEW ON MY BLOG:)

http://miss80million.blogspot.com/2010/11/review-bundle-monster-image-plates-vs.html#more
2ND BUNDLE MONSTER IMAGE PLATE SET REVIEW:

http://www.youtube.com/watch?v=q65stkEfCHs

Sunday, November 27, 2011

Rainbow Fimo Flowers - Nail Art Tutorial

Happy Sunday to all!

Here's another tutorial for you using more fimo and beads.  yay for 3d accessories!

If you don't have the fimo you can always draw in some flowers, or stamp some on.
And if you don't have beads, of course you can always replace them with dots.
Hope you enjoy!

MATERIALS USED:
OPI - Sparke de Triomphe
Fimo - www.bundlemonster.com
beads - local arts/craft store
dotting tool - ebay.com
LA Colors Art Deco - Black
Sally Hansen - Insta Dry Anti Chip Top Coat

Practice hand - ebay

Saturday, November 26, 2011

2-in1 Green Lace - Nail Art Tutorials

I already had a plain green manicure on my nails and felt like filming a tutorial but didn't feel like completely starting from scratch.  This is what I came up with.  It's free hand and pretty easy to do.  I was originally going to do each nail a little different but then realized that the ring finger was so drastically different than the other designs that I simply split the footage up into two distinct tutorials.

Hope you enjoy!


MATERIALS USED:
Seche Clear - base coat (not shown)
Essie - Going Incognito
China Glaze - White On White
Revlon - Quick Dry Top Coat

Dotting tools - from ebay
detail brush - 3/0 Deserres C510 - from Deserres Art Store

Hope you give it a try!
Good Luck!

Friday, November 25, 2011

Black & White Abstract - Nail Art Tutorial

Ooooh.  I really like this one.
Hope you do too!
It's so simple yet elegant and classy and edgy all rolled into one.


LIST OF MATERIALS:
Orly - Goth
LA Colors Art Deco - White
LA Colors Art Deco - Black
LA Colors Art Deco - Glitter Red
OPI - Heart of Gold

If you're doing this on your natural nails, don't forget to apply a base coat! :)

Hope you give this design a try!
Good Luck!

Wednesday, November 23, 2011

NAIL FAIL: halloween haunts

Hi Everyone,

I've got a 'Nail Fail' for you today.

For those of you unfamiliar with this series:
     Nail Fails are posts that I publish with no particular regularity.  I only post updates to this series when I attempt to create a nail design which didn't remotely resemble my intended aesthetic, or for some other reason simply falls short of my expectations.  It certainly doesn't mean that it's necessarily an 'ugly' design.  But for some reason or other, I decided to ditch the tutorial and not post it to
     So instead, as my blog followers, you get to see the reality of my nail art trials and tribulations and the reality of my craft: not every design is a winner.  
I've done some designs that didn't quite work out and I've been lazy about posting them so here you go.  This is the last of the bunch that I was too lazy to post.  You're welcome.  :)
 This one was supposed to be a jack-o-lantern.  yikes.  sure didn't turn out well.  Although its creepiness may actually give it some merit considering the holidays it was designed for.

Colours used:
Rimmel - Black Satin
Color Club - Almost Famous
Color Club - Wham Pow!

This one was replaced with a simple skull stamping tutorial.  The original idea was to do Jack Skellington from Nightmare Before Christmas.  Sheesh.  yeah.... no.

Colours used:
Rimmel - Black Satin
China Glaze - White On White

This was a failed attempt at stamping.  I had tried to squeeze three halloween themed images onto my nails - spider, spider web, bats.  If it hadn't failed so horribly I probably would have tried to put the witch on there too.  (All images on Bundle Monster Image Plate BM13  - from their first bundle.)
I suspect the stamping fail was because I took too long after scraping the polish and picking it up on the stamp.  so the spider web on my ring finger ended up looking all mangled.  I think that's when I decided to try again with a second web, which also failed.  and then proceeded to attempt to cover it up with a large spider.  no such luck.  eech.   

Polish used:
...either Konad Special polish - black
or American Apparel - Hassid.
..I don't remember which I actually used.

Snowflakes & Stars - Fimo Nail Art Tutorial

Okay.  It's been a while since I broke out the Fimo and rhinestones and large glitters.  So Here's one with all three!  It may be over the top for some of you, so if you still like the design, feel free to take away some details and adjust it to your own taste.


Hope you enjoy the tutorial.


MATERIALS USED: (and where to purchase)
Kiko - #338 (from Kiko store in paris. possibly you can get this online too?)
Seche Clear - base coat (for clear polish)
Snowflake fimo - from bundlemonster.com
Dotting tool - from ebay
China Glaze - White On White
Glitter Lavender Stars- www.dollarnailart.com
Clear Rhinestones - michaels craft store
Revlon - Quick Dry Top Coat

Tuesday, November 22, 2011

NAIL FAIL: fall leaf

Hi Everyone,

I've got a 'Nail Fail' for you today.

For those of you unfamiliar with this series:
     Nail Fails are posts that I publish with no particular regularity.  I only post updates to this series when I attempt to create a nail design which didn't remotely resemble my intended aesthetic, or for some other reason simply falls short of my expectations.  It certainly doesn't mean that it's necessarily an 'ugly' design.  But for some reason or other, I decided to ditch the tutorial and not post it to
     So instead, as my blog followers, you get to see the reality of my nail art trials and tribulations and the reality of my craft: not every design is a winner.  
I've done some designs that didn't quite work out and I've been lazy about posting them so here you go.  I'll be posting one each day for the next few days.
This one was supposed to be a leaf.  Inspired by autumn weather and scenery.
Yeah.  just didn't turn out well.  I should have stopped before adding the red 'accent' onto the yellow leaf.  I'm pretty sure that's when I decided this design would end up in this series.
Oh well.  better luck next year.

Colours used:
China Glaze - Passion
Sally Hansen Xtreme Wear - Mellow Yellow
Sally Hansen Xtreme Wear - Cherry Red

meh.

Monday, November 21, 2011

NAIL FAIL: something something

Hi Everyone,

I've got a 'Nail Fail' for you today.

For those of you unfamiliar with this series:
     Nail Fails are posts that I publish with no particular regularity.  I only post updates to this series when I attempt to create a nail design which didn't remotely resemble my intended aesthetic, or for some other reason simply falls short of my expectations.  It certainly doesn't mean that it's necessarily an 'ugly' design.  But for some reason or other, I decided to ditch the tutorial and not post it to
     So instead, as my blog followers, you get to see the reality of my nail art trials and tribulations and the reality of my craft: not every design is a winner.  
I've done some designs that didn't quite work out and I've been lazy about posting them so here you go.  I'll be posting one each day for the next few days.

Here's another design that was inspired by a print on print & pattern.
I can't figure out what the heck to call this design, so as the title of this post says, it's something, something.  hahahaha.
     This one really did not turn out as intended.  I think the original design was really pretty but maybe just too busy for such a small canvas such as a finger nail.  Well, either that or I'm simply not skilled enough to pull it off.
     I like certain aspects of this design.  I like how the pink dots are layered over another pattern.  It give the design some complexity.  But the big yellow thing (I think it was supposed to be a sun) just looks kinda odd.  Maybe I'll try something in this style but with fewer layers of patterns and objects.  Here's hoping that endeavour turns out better than this one.  

Polishes used:
Gosh - Lambada
LA Colors Art Deco - Baby Pink
SpaRitual - Surreal
Sally Hansen Xtreme Wear - Mellow Yellow

Thoughts?

Purple Gradient Zebra - Nail Art Tutorial

This was a requested design.  Hopefully I did it justice.
I really like the colour scheme.  It's very feminine and delicate under that bold zebra print.


MATERIALS USED:
Revlon - Quick Dry Base Coat
Color Club - Puccilicious
American Apparel - L'Esprit
OPI - Steady As She Rose
LA Colours - White Striper polish
LA Colours - Black striper polish
Sally Hansen - Insta Dry Anti Chip Top Coat

To see the tutorial for the design on my other finger:
Retro Dry Marbling: http://www.youtube.com/watch?v=jdq_0xkvNuE

Sunday, November 20, 2011

NAIL FAIL: dusty wallpaper

Hi Everyone,

I've got a 'Nail Fail' for you today.

For those of you unfamiliar with this series:
     Nail Fails are posts that I publish with no particular regularity.  I only post updates to this series when I attempt to create a nail design which didn't remotely resemble my intended aesthetic, or for some other reason simply falls short of my expectations.  It certainly doesn't mean that it's necessarily an 'ugly' design.  But for some reason or other, I decided to ditch the tutorial and not post it to
     So instead, as my blog followers, you get to see the reality of my nail art trials and tribulations and the reality of my craft: not every design is a winner.  
I've done some designs that didn't quite work out and I've been lazy about posting them so here you go.  I'll be posting one each day for the next few days.


This nail design is called Dusty Wallpaper.
I actually really do like it.  It was inspired by a fabric print somewhere on the blog print & pattern.  Unfortunately I don't have a link to the exact image (but I think it's somewhere in the realm of august 2011. if you're dying to search for it.)
The reason it made the Nail Fail series was simply because of a filming issue I had which made the tutorial nearly useless.  The lighting I had while filming was so lacking that I was describing so many things that you simply couldn't see.  So here it land, in the Nail Fail series instead.  What a shame. 
I really like this design.  It makes me think of a print on a dress that I might be able to find at Anthropology.

Polishes used in this design:
Colour Club - Positively Posh
Colour Club - Soft as Cashmere
Sally Hansen - White On
Essie - Turqouise and Caicos
Essie - Lapis of Luxury
OPI - Melon of Troy

What are your thoughts on this design?

Retro Dry Marbling - Nail Art Tutorial


I don't want to leave you with only a week of nail fails, so to break of the nail wrecks, here's a simple dry/drag marbling tutorial:  A great alternative to the water marbled look without the mess.
LIST OF MATERIALS:
American Apparel - Mannequin
American Apparel - Peacock - you can buy American Apparel polishes in American apparel stores or at http://americanapparel.net/
Dotting tool from ebay
sewing needle
Sally Hansen Insta Dry Anti Chip Top Coat
DON'T FORGET TO APPLY A BASE COAT AND TOP COAT


Other Dry Marbling tutorials:

Saturday, November 19, 2011

NAIL FAIL: quirky sci-fi

Hi Everyone,

I've got a 'Nail Fail' for you today.

For those of you unfamiliar with this series:
     Nail Fails are posts that I publish with no particular regularity.  I only post updates to this series when I attempt to create a nail design which didn't remotely resemble my intended aesthetic, or for some other reason simply falls short of my expectations.  It certainly doesn't mean that it's necessarily an 'ugly' design.  But for some reason or other, I decided to ditch the tutorial and not post it to
my Youtube channel.
     So instead, as my blog followers, you get to see the reality of my nail art trials and tribulations and the reality of my craft: not every design is a winner.
I've done some designs that didn't quite work out and I've been lazy about posting them so here you go.  I'll be posting one each day for the next few days.


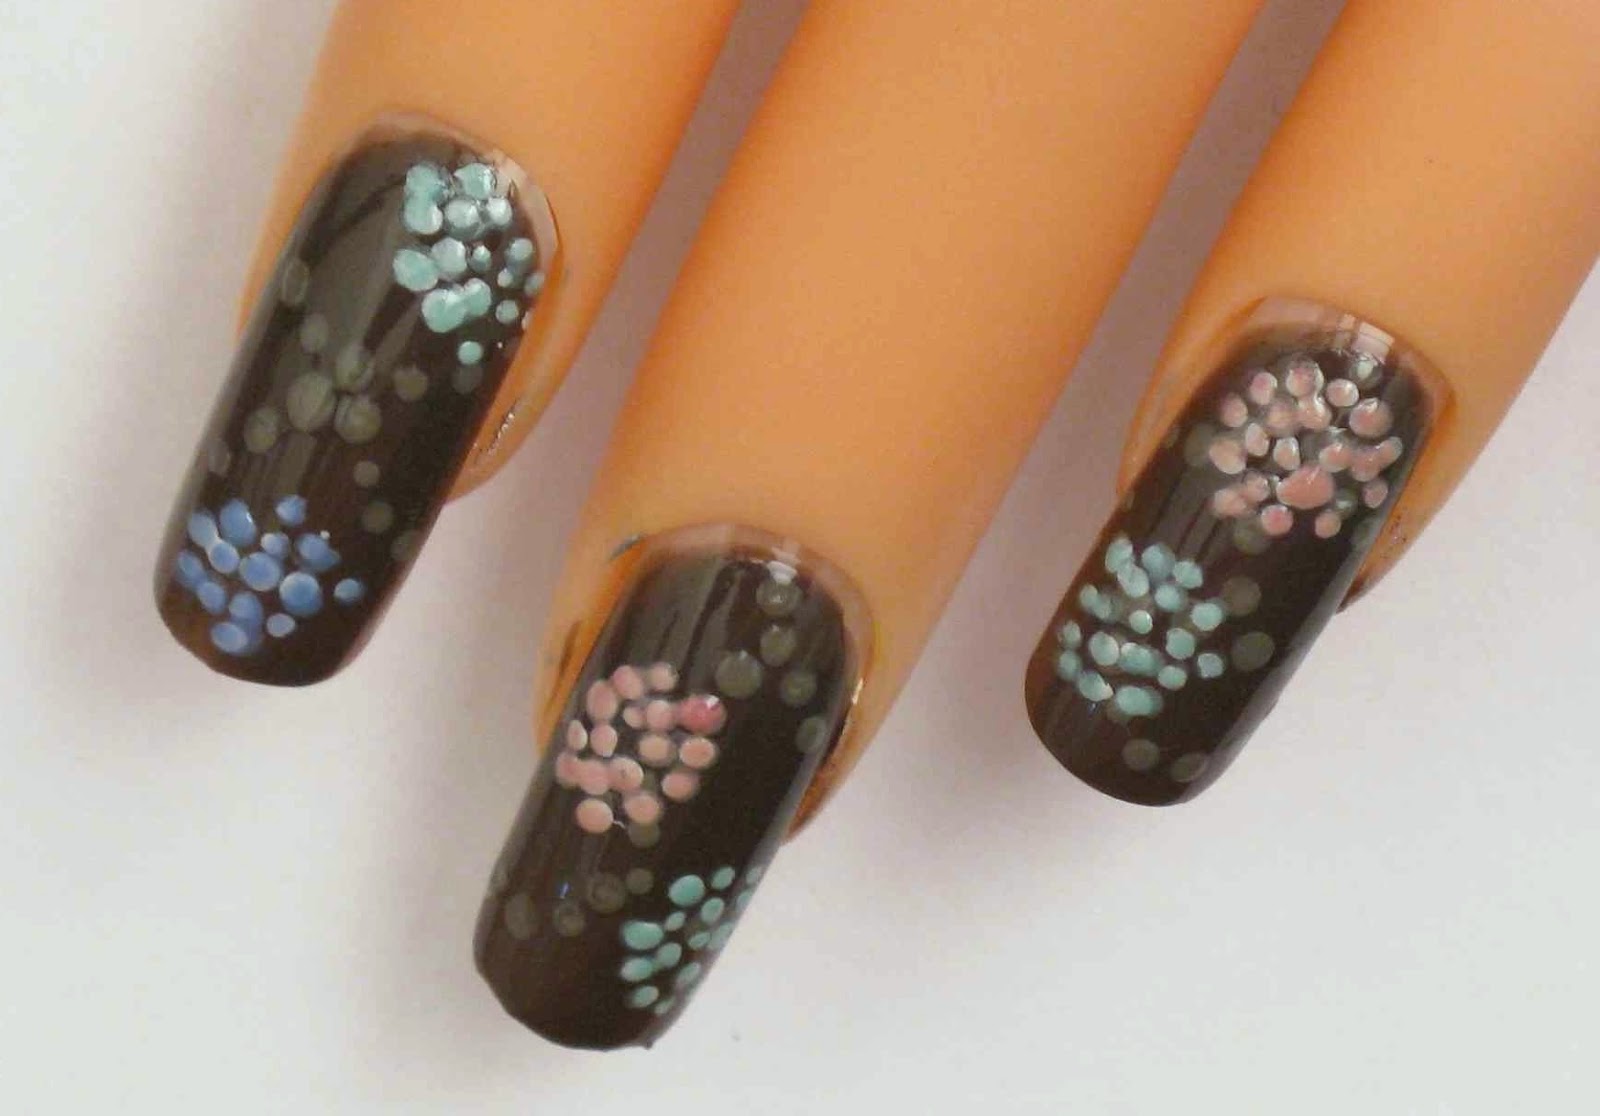
     This one I called: Quirky Sci Fi.  That's kinda what I think of when I see this design.
I had no real design intent when I started creating this on a whim.  But i'm not super in love with it.
I think it looks sic-fi to me because of the orange dots over the yellow line.  It makes me think of the visual trail that'd be temporarily left behind when a cartoon space ship, or flying/hovering vehicle passes by.  hmm.. I was originally thinking that it reminded me of Star Trek, but now after that description i'm imagining The Jetsons.
     I do like how the cluster of dots appears very imperfect.  I think I did end up using that style of dots in a tutorial later.  But here, it does look a bit odd.  Kind of like a mud trail that a dog that was playing fetch out in the rain would leave behind,
     Okay.  That's enough visualization for this design.

For the colour curious, the polishes I used are:
Sally Hansen Complete Salon Manicure - Evening Fog
Orly - Orly Platinum
LA Colours Art Deco - Black striper polish
Color Club - Almost Famous
Color Club - Wham Pow!

What do you think?
Do you love it?  Or are you kinda thinking, "meh" like I am?

Monday, October 31, 2011

Product Review: Born Pretty Store - Nail Stickers


Hi everyone!
Here is a product review for you today.  I was sent these nail stickers for review from bornprettystore.com.  It's my very first time trying nail stickers, so watch and see how I do.

As promised in the video I will be doing another review of a comparable product that can be purchased in stores - the Sally Hansen Salon Effects Nail Stickers.
This review will hopefully be up within a couple weeks.


QUICK POINTS:
*Application was a bit tricky.
*Durability was definitely lacking.  I'm also not a fan of my nail polish/art staying on my nails for 11 days.  So I wasn't really that upset that the stickers didn't last 11 days.
*The selection in amazing - I mean, seriously.  How can you beat 106 patter choices???
*And the price is pretty great too.
*It was definitely fun, and something I'd recommend for a fun night out where you want your nails to get a lot of attention.  
*So overall, it's a great value and worth checking out if you're new to nail stickers, or you're a pro at them.


Are you a big fan of nail stickers?
What's your favourite brand?  favourite print?


This is a review of the nail stickers from http://www.bornprettystore.com/  site-wide 5% off coupon M5MK31 valid until January 30, 2012.

The product was sent to me for free for review purposes. 
My review is my own opinion and in no way is influenced by the product provider.

Here's a direct link to the page of the website with the stickers:
http://www.bornprettystore.com/16pcs-nail-decoration-nail-foil-sticker-patter...

GOT QUESTIONS ABOUT THE STORE/WEBSITE/SHIPPING/ etc...?
http://www.bornprettystore.com/faq.php

Sunday, October 30, 2011

NOTD: Lavender/Taupe Ombre Nails

Happy Sunday Everybody!

Here's an old pic of a Nail of the Day from the first week of October.
Now i'm personally a huge fan of the ombre trend.  Yes, I know it's very last year, but what can I say.  It's a great subtle way to add a bit of spice to your manicure - in a way that's very work and school appropriate.

I must admit that although I love a great ombre manicure, if i've got a craving for some real eye catching nail art this isn't what you should be going for.

For this manicure I used 5 different polishes:
{from thumb to pinkie}
China Glaze - Diva Bride
OPI - Steady As She Rose
OPI - Done Out In Deco
Essie - Chinchilly
Essie - Power Clutch

Tuesday, October 25, 2011

Halloween Nail Art Tutorials Galore!

I've been slacking on posting my tutorials to my blog big time.


So since Halloween is almost upon us, here are all my halloween tutorial all in one blog post.


I've got two free hand ones and two stamping ones - so hopefully there's something for everyone.
I'll attach all the pics first and have the videos after the jump.


The first is the mask from the blockbuster 
movie Scream (and Scream 2,3,4.)
I also added on a bit of a streaky red 
and white french tip.  
I think it looks frighteningly fantastic!


The first stamping tutorial is a bundle monster one.
Guess it's not really a tutorial since I don't really do
anything out of the ordinary.  But it's still a basic
stamping tutorial non-the-less.  So if you're new
to stamping, here's a very basic one for ya.


The next stamping tutorial is still not that difficult
- how hard can stamping really get, right?
I gave the pumpkin two different finishes.
I prefer the matt finish.  Do you agree?


And the last tutorial that I just filmed and put up
today is a free hand dry/drag marbling spider web.
It's pretty easy, but just make sure your bottom
colour isn't a quick drying polish.
It might make the dragging difficult.


What is everyone doing to celebrate this spooky holiday?
I'm going to a friend's house party.  My boyfriend and I are dressing up as Woody and Bo Peep from Toy Story.  I'm pretty excited.  He's going to look awesome.  I'll look pretty good to -- but i gotta admit that i'm far from excited about the idea of wearing a blond wig all night.  eech.  


Hopefully i'll post pics :)


So, as promised.
click the link below to be taken to the video tutorial!
(or just check out my youtube channel.  whatever suits your fancy :)


Monday, October 10, 2011

Breast Cancer Awareness Month - Nail Art Tutorial

October is the month of all things pink.  Especially including the pink ribbon that you'll see people wearing in support of Breast Cancer Awareness Month.
Although I don't personally know anyone who's been affected with Breast Cancer, it's something that's often in my mind when the big C is mentioned.

So as a reminder to everyone to donate any amount you can and to pick up your pink ribbon, here's a tutorial dedicated to this month.

It's very simple but serves the purpose well, i think.
Hope you enjoy.


Materials Used:

Color Club - Lazer Pink
China Glaze - White On White
LA Colors Art Deco - Baby Pink striper polish
LA Colors ARt Deco - White striper polish

Dotting tool - from ebay.
Sewing needle

Sunday, October 9, 2011

Nail Polish Picks - Fall Favourites 2011

So far behind in my blog and youtube channel.  I told myself that I'd do this within the first week of fall.  well so much for that.
But it's not too late.  So here are my picks for what kind of nail polishes I'll be wearing this fall.  As expected, the fall season brings about a drastic change in the color palette of fashion and beauty.  Changing from the bright vibrant neons of spring and summer, autumn usually is full of darker more muted colors.  I've tossed in a couple of 'bright' colors just for the heck of it.  Because, I don't actually expect myself to wear only muted colors this entire season.  I'm pretty sure I'll get bored of them at some point and have to bust out a vibrant red or something of the like.

So below is the video showing my picks for this fall season.
What will you be wearing this fall?

Thursday, October 6, 2011

FALL Nail Polish HAUL

wow.  it's been way too long.  the days and weeks are just getting away from me.  It's been almost 3 weeks since I posted a tutorial or NOTD or anything at all.

Here's a haul that I filmed a week or so ago.  I haven't purchased anything since so it's still relevant.  Also, I'll have a post up in a couple days of my top fall polish picks for autumn 2011.

After the jump I'll also include photos of all the individual bottles so you can actually see them in focus (unlike in the video - as my camera does not auto focus.)

Enjoy!


Continue here for the pictures.
{{{warning: VERY VERY VERY picture heavy.}}}

Tuesday, September 20, 2011

Blue & Purple Fading - Bundle Monster Stamping Tutorial [BM210]

Here's a really cute stamping/fading design for you today!
I think it's really cute.  


MATERIALS USED:


Sally Hansen Xtreme Wear - Shooting Star
Bundle Monster Image Plate: 210 - from www.bundlemonster.com or amazon.com
Konad Special Polish - Black - from www.wowsocool.com
Konad Stamper & Scraper - from www.wowsocool.com
Hex Lavender glitter - from www.dollarnailart.com
Sally Hansen Insta Dry - Anti Chip Top Coat
Dotting tool - from ebay.com


***IF YOU'RE NEW TO STAMPING***
Check out these videos for some helpful tips and tricks and info:


KONAD ANSWERS - to all your fequently asked questions:
http://www.youtube.com/watch?v=civQl9mAuWo&list=PLAC46D18903E635DD&index=2


KONAD TESTS - testing out non special polishes for stamping
http://www.youtube.com/watch?v=E7hLdrHaHms


HOW TO CLEAN YOUR STAMPER, SCRAPER, AND IMAGE PLATES:
http://www.youtube.com/watch?v=OEPsWTFqIH0&list=PLC58E5D9FAB07659A&index=1

Tuesday, September 13, 2011

Multicolored Spots - Nail Art Tutorial

Here's a very simple dotting nail art tutorial done on my short natural nails.  It's a delicate looking manicure that even a novice can pull off.  (on both hands :)
As you can tell this is an older tutorial (with my previous camera angle/setting)  I'm pretty sure it's the last one that I have that has been filmed with this view that is farther away from my nails.  So don't worry.  All of my new tutorials will have the newer and closer camera angle from now on.  :)

Hope you enjoy this tutorial and give it a try if you like it.  :) And yes, i know it's very similar to another tutorial of mine : Cool Kaleidoscope Nails http://www.youtube.com/watch?v=Zkop3Pjqn24.
It uses similar basic technique, but obviously has a very different end result.
Enjoy!

Materials Used:
Revlon - Quick Dry Base Coat
Rimmel Lasting Finish Pro - Black Satin
Sally Hansen Xtreme Wear - White On
Color Club - Chelsea Girl
Color Club - Puccilicious
Color Club - Power Play
Color Club - Lime Light
Sally Hansen Xtreme Wear - Sun Kissed
Revlon - Quick Dry Top Coat
---------------------------------
Dotting Tool - from ebay
Hex Peach Ice Glitter - from www.dollarnailart.com

Monday, September 12, 2011

Herringbone Print Nails - Bundle Monster Stamping Tutorial - [BM201]

I don't remember how I decided to do a Herringbone print nail.  But I do remember that when I realized that I could make it easy by using a bundle monster image plate I was so ecstatic.  I know this is a bummer for those of you who don't have any stamping tools but don't worry.  As you have probably noticed, I do switch back and forth between stamping and free hand designs.  :)

I'm also hoping to have time one of these days to do a stamping tutorial as well as a free hand version of the same design.  Not sure that I can necessarily do that for every design - because some things that are done with stamping simply are not easily done by hand.  But the idea is definitely in the back of my mind stewing for the next time I have a great design that I can do with both konad/bundle monster and by hand.

But if you do have the second Bundle monster stamping plates, here's a really easy chic alternative to houndstooth or plaid print nails.


Materials Used:
Revlon - Quick Dry Base Coat
Color Club - Soft As Cashmere
Bundle Monster Image Plate - 201 [from bundle monster.com]
Konad Special Polish - Black [all Konad products from www.wowsocool.com]
Konad Scraper
Konad Stamper
Striper Brush - 10/0 Black Gold by Dynasty 206 SL [from local art store]
Sally Hansen - Insta Dry Anti Chip Top Coat


***IF YOU'RE NEW TO STAMPING***
Check out these videos for some helpful tips and tricks and info:
KONAD ANSWERS - to all your fequently asked questions:
KONAD TESTS - testing out non special polishes for stamping
HOW TO CLEAN YOUR STAMPER, SCRAPER, AND IMAGE PLATES:

Sunday, September 11, 2011

Camouflage Nails - Nail Art Tutorial

Here's a great tutorial for the Autumn season.
     It's on trend with the military greens that are in fashion this season and it's a classic print.  If you don't like greens, you can always switch it up by using shades of blue or pink or greys, as camouflage has already been done in pretty much every colour under the sun.
     It's a relatively simple design.  I definitely googled an image of camouflage print while creating this design. So find a good inspiration camouflage design you like and let's get us some camo nails for the start of Fall.


MATERIALS USED:
Seche Clear - Base Coat
Color Club - Snake Skin
American Apparel - Army Jacket
Essie - Going Incognito
Color Club - Wild Orchid
Revlon - Quick Dry Top Coat
Brushes - (can buy from your local art store)
     Loews Cornell - 795 Round Brush - Size 0
     American Painter - Spotter Brush - Size 5/0

Saturday, September 10, 2011

Dirty Girly Tires - Bundle Monster Stamping Tutorial [BM201, 202]

Here's another catch-up tutorial.  
It's a bundle monster stamping tutorial.  I think it's very youthful and fun.  Hope you give it a shot if you enjoy the design!  :)


Materials Used:
BM 201, 202 bundle monster stamping plates - from bundlemonster.com
Konad stamper & Scraper  - from www.wowsocool.com
Revlon - Quick Dry Base Coat
Gosh - Nero
Sally Hansen Xtreme Wear - White On
Color Club - Power Play
Sally Hansen - Insta Dry Anti Chip Top Coat


Onyx - Nail Polish Remover from Walmart


Tutorial for Gingham'n'Stars (the design on my other hand):
http://www.youtube.com/watch?v=LjQANl4dDJY


***IF YOU'RE NEW TO STAMPING***
Check out these videos for some helpful tips and tricks and info:


KONAD ANSWERS - to all your fequently asked questions:
http://www.youtube.com/watch?v=civQl9mAuWo&list=PLAC46D18903E635DD&index=2


KONAD TESTS - testing out non special polishes for stamping
http://www.youtube.com/watch?v=E7hLdrHaHms


HOW TO CLEAN YOUR STAMPER, SCRAPER, AND IMAGE PLATES:
http://www.youtube.com/watch?v=OEPsWTFqIH0&list=PLC58E5D9FAB07659A&index=1

Friday, September 9, 2011

Bubbly Ribbons - Nail Art Tutorial

Tutorial Catch-Up Day 3

This tutorial is a free hand design.  It's pretty simple and doesn't require any special tools.  I used only two colours of nail polish (of course, feel free to swap in your two favourite colours of choice) and a thin striping brush (script brush) that I got from my local art store.

If this design grabs your interest, grab your polishes and lets get started!


MATERIALS USED:

Revlon - Quick Dry Base Coat
Rimmel Lasting Finish Pro - Black Satin
Sally Hansen Xtreme Wear - Celeb City
Dotting Tool - from ebay
Striper Brush (script brush) - from art store 10/0 Black Gold by Dynasty 206SL
Revlon - Quick Dry Top Coat

Thursday, September 8, 2011

Leaves on Fire - Bundle Monster Tutorial [BM210]

Day 3 of tutorial catch up.

Here's a Bundle Monster stamping tutorial using Image plate 210 from the second bundle.
I know the colours look a bit off and are a little hard to see - due to the bad lighting, but hopefully you get the idea.  I have already changed my video set up and it seems to make a big difference with the lighting.  Tutorials with the new lighting will start at the end of this 5 day catch up.  :)  Hope you enjoy this design!


Materials used:
Revlon - Calcium Gel Nail Hardner
OPI - The Thrill of Brazil
Color Club - Warhol
Color Club - Wham Pow!
Color Club - Almost Famous
Bundle Monster Image Plate - 210
Gosh - Nero
Sally Hansen - Insta Dry Anti Chip Top Coat

Konad Stamper & Scraper - from www.wowsocool.com {{coupon code: wowsocool20 for 20% off your purchase.  expires september 30, 2011)
Dotting tool - from ebay
Cosmetic Sponge - from any drugstore

BASIC STAMPING LINKS

***IF YOU'RE NEW TO STAMPING***
Check out these videos for some helpful tips and tricks and info:

KONAD ANSWERS - to all your fequently asked questions:
http://www.youtube.com/watch?v=civQl9mAuWo&list=PLAC46D18903E635DD&index=2

KONAD TESTS - testing out non special polishes for stamping
http://www.youtube.com/watch?v=E7hLdrHaHms

HOW TO CLEAN YOUR STAMPER, SCRAPER, AND IMAGE PLATES:
http://www.youtube.com/watch?v=OEPsWTFqIH0&list=PLC58E5D9FAB07659A&index=1

Wednesday, September 7, 2011

Summer Pink & Green Abstract - Nail Art Tutorial

Hi Everyone.  


Okay.  Day 2 of tutorial catch up.  I am going to sit my butt down on this chair until I have made one post per day so my blog is caught up with my youtube channel.  Again, for those of you who need to be in the know asap, my youtube channel is: www.youtube.com/miss80million.  you can click the little yellow subscribe button on the left column and you'll be updated with my new tutorials and other videos as soon as I post them.  
If you're in no rush, *most* of them make it to my blog too so you can just check back as I'll be posting one catch-up tutorial each day for the next 5 days.  :)


This tutorial is a bit of a generic 'abstract' design.  But I think the colours are really fresh and summery.  


The full list of materials will be listed under the video.
Hope you enjoy watching the tutorial.  and send me a pic of you decide to try it out for yourself.  :)


Materials used:
Revlon - Quick Dry Base Coat
Rimmel - Sunset Orange
LA Colors Art Deco - Mint Green
LA Colors Art Deco - Baby Pink
Rimmel - French White Tip Pro
Dotting Tool - from ebay
Revlon - Quick Dry Top Coat

Monday, September 5, 2011

JEWEL TONED PRINT - BUNDLE MONSTER TUTORIAL - [BM01]

This design was inspired by a print I saw on http://printpattern.blogspot.com/.  This blog has recently become my new muse!  There are so many different print for fabrics, paper, ceramics etc.  I love the styles of all the different prints.  It's a great new inspiration for my nail art designs!  (I tried to find the exact post with the specific design that inspired this design but my eyes got all dizzy from scrolling down through all the pages.  But hopefully you get the gist of the website enough to see the style I was going for.  


Hope you enjoy!


(ps.  Once again, I've got a lot of tutorial catching up to do. If you don't want to wait to see the other 5 video tutorials that I will be posting in the next few days, check out my youtube channel and subscribe to keep up with my latest tutorials.  :)


Materials Used;
OPI - Yodel Me On My Cell
Bundle Monster Image Plate - 01 {From bundlemonster.com}
China Glaze - Passion
Konad Stamper and Scraper {from wowsocool.com}
Sally Hansen - Lavender Cloud
Dotting Tool - {from ebay}
Sally Hansen Xtreme Wear - Emerald City
Sally Hansen Xtreme WEar - Plum Power
Sally Hansen Insta Dry - Anti Chip Top Coat